Create the Blazor WebAssembly Application
This step covers the standard standalone Blazor WebAssembly client shape used by the direct API access application model.
Create a new Blazor WebAssembly application in Visual Studio. For the common standalone authentication flow, choose individual accounts or an equivalent OIDC-capable authentication setup that fits your identity provider.
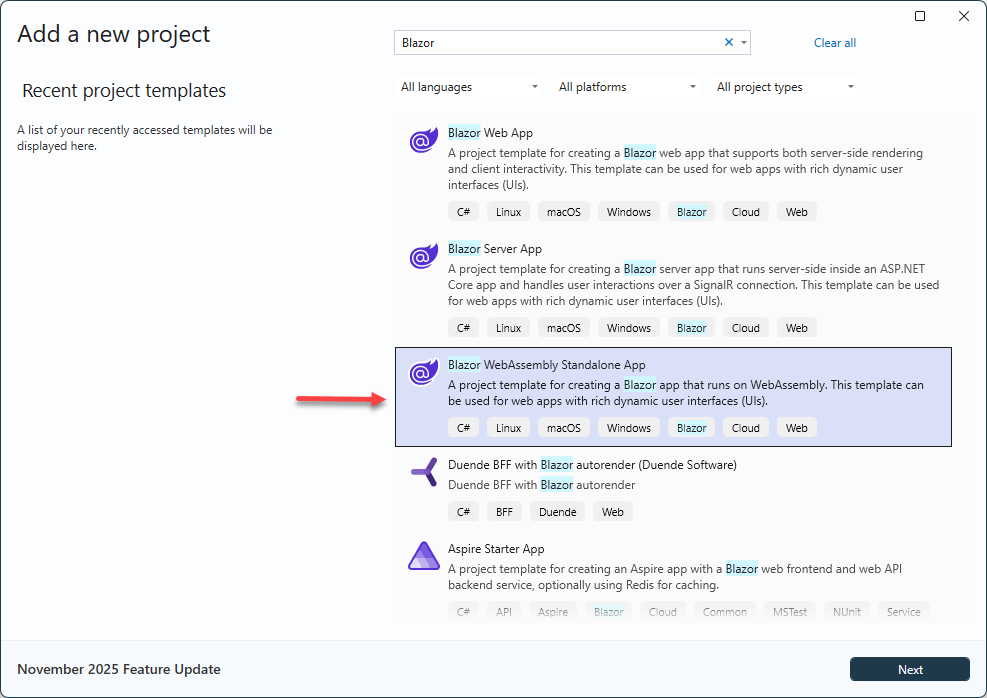
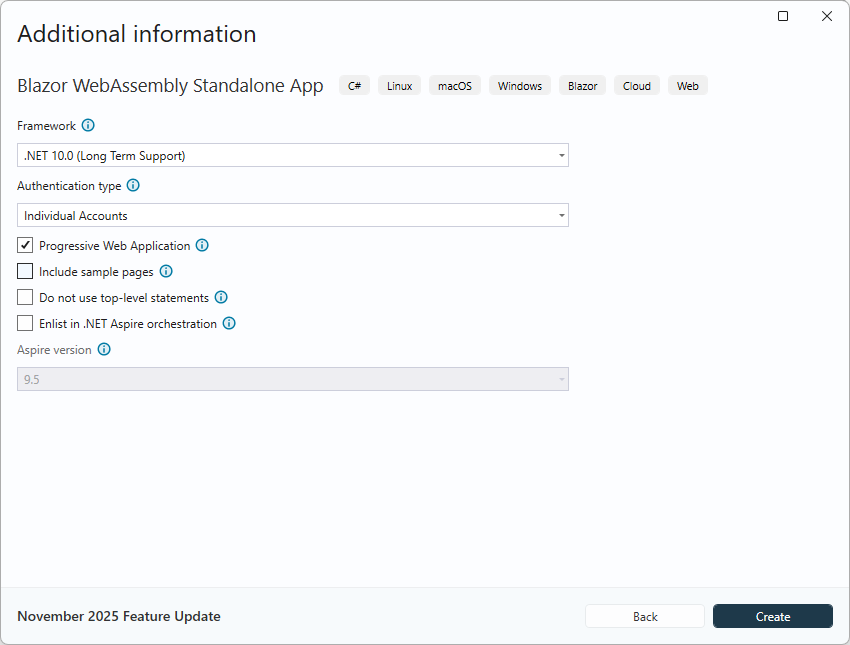
Create the standalone Blazor WebAssembly application before configuring direct API access and authentication details.
Create the project
Create a new Blazor WebAssembly application in Visual Studio.
For the common standalone authentication flow, choose individual accounts or an equivalent OIDC-capable authentication setup that fits your identity provider.
Install RecroGrid Framework Blazor UI
RecroGrid Framework Blazor UI is distributed as the 
dotnet add package Recrovit.RecroGridFramework.Client.Blazor.UI
Install-Package Recrovit.RecroGridFramework.Client.Blazor.UI
If the template still includes Bootstrap in index.html, remove that reference so the application does not mix the old default styling with the RecroGrid Framework UI setup.
<link href="css/bootstrap/bootstrap.min.css" rel="stylesheet" />
Register RecroGrid Framework services
In Program.cs, register the standalone bearer-token client integration.
using Microsoft.AspNetCore.Components.Web;
using Microsoft.AspNetCore.Components.WebAssembly.Hosting;
using Recrovit.RecroGridFramework.Client.Blazor;
using Recrovit.RecroGridFramework.Client.Blazor.UI;

var builder = WebAssemblyHostBuilder.CreateDefault(args);
builder.RootComponents.Add<App>("#app");
builder.RootComponents.Add<HeadOutlet>("head::after");

builder.Services.AddScoped(sp => new HttpClient { BaseAddress = new Uri(builder.HostEnvironment.BaseAddress) });

builder.Services.AddOidcAuthentication(options =>
{
    builder.Configuration.Bind("Local", options.ProviderOptions);
});

var loggerFactory = builder.Services.BuildServiceProvider().GetRequiredService<ILoggerFactory>();
var logger = loggerFactory.CreateLogger<Program>();
builder.Services.AddRgfBlazorWasmBearerServices(builder.Configuration, logger);

var host = builder.Build();

await host.Services.InitializeRgfBlazorAsync();
await host.Services.InitializeRgfUIAsync();

await host.RunAsync();
Configure the route shell
<Router AppAssembly="@typeof(App).Assembly" NotFoundPage="typeof(Pages.NotFound)"
        AdditionalAssemblies="new[] { typeof(Recrovit.RecroGridFramework.Client.Blazor.Components.RgfEntityComponent).Assembly }">
    <Found Context="routeData">
        <RouteView RouteData="@routeData" DefaultLayout="@typeof(MainLayout)" />
        <FocusOnNavigate RouteData="@routeData" Selector="h1" />
    </Found>
</Router>
Import the namespaces
@using Recrovit.RecroGridFramework.Client.Blazor.Parameters
@using Recrovit.RecroGridFramework.Client.Blazor.UI
@using Recrovit.RecroGridFramework.Client.Blazor.UI.Components
Configure the main layout
@inherits LayoutComponentBase

<RgfRootComponent>
    <header class="rgf-page-header">
        <div class="rgf-navbar-host">
            <NavbarComponent MenuParameters="@(new RgfMenuParameters() { MenuId = 10001 })"
                             NavbarBreakpoint="lg"
                             BrandText="RGF Demo App"
                             ShowThemeSelector="true"
                             ShowLanguageSelector="true">
                <NavbarRightContent>
                    <div class="login-display">
                        <LoginDisplay />
                    </div>
                </NavbarRightContent>
            </NavbarComponent>
        </div>
    </header>

    <main class="rgf-page-main">
        @Body
    </main>
</RgfRootComponent>